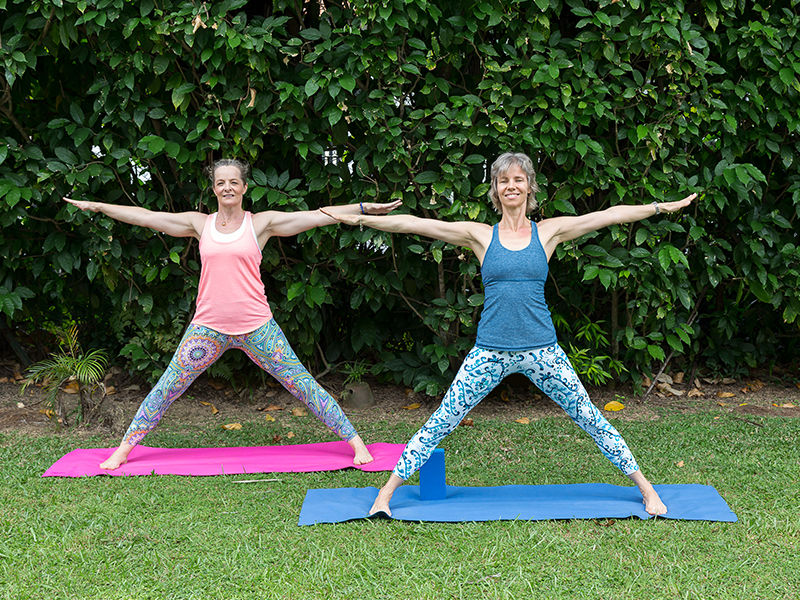
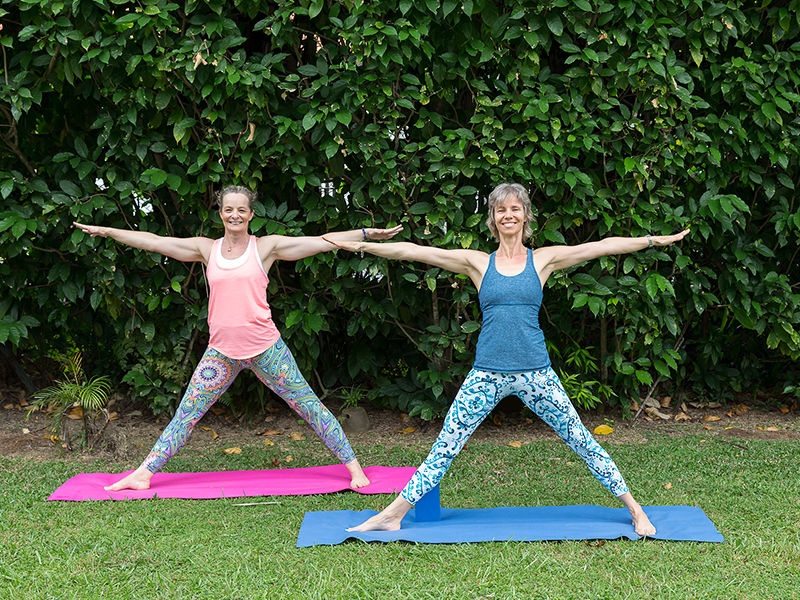
It’s no secret that practicing yoga has loads of health benefits, from enhanced muscle tone and strength, to improved circulatory health and increased energy, among others. Here, yoga friends Sarah Powell of Sarah Powell Yoga and Sarah Barguirdjian of Sarah B Yoga take us through three poses.
Trikonasana (Triangle Pose)
Not only does the triangle pose help stabilise your core and torso while stretching your feet, calves, hamstrings and groin, but it also aids digestion and helps relieve stress. Additionally, the pose challenges your balance, which, in turn, helps improve your focus and coordination.
Trikonasana can be done with a yoga block (see Sarah B, pictured right) or without (see Sarah P at left). “Don’t be fooled into thinking that a block is ‘only for beginners’,” says Sarah B. “A block can help make poses harder and enable you to gain the full expression of the pose.” Tip: If you’d like to use a block but don’t have one, use a thick book instead!
Step #1
Standing on your mat, spread your feet and arms out wide, making sure your ankles are aligned under your wrists. Then take two deep breaths.
Tip: Engage your leg muscles by pretending to drag your feet towards each other (this won’t make your feet actually move, but you’ll feel your leg muscles kick in!).
Step #2
Turn your right foot 90 degrees to face the front of your mat. Press down through both feet and keep the tone in your leg muscles (as if you’re “hugging the muscle to the bone!”).
Step #3
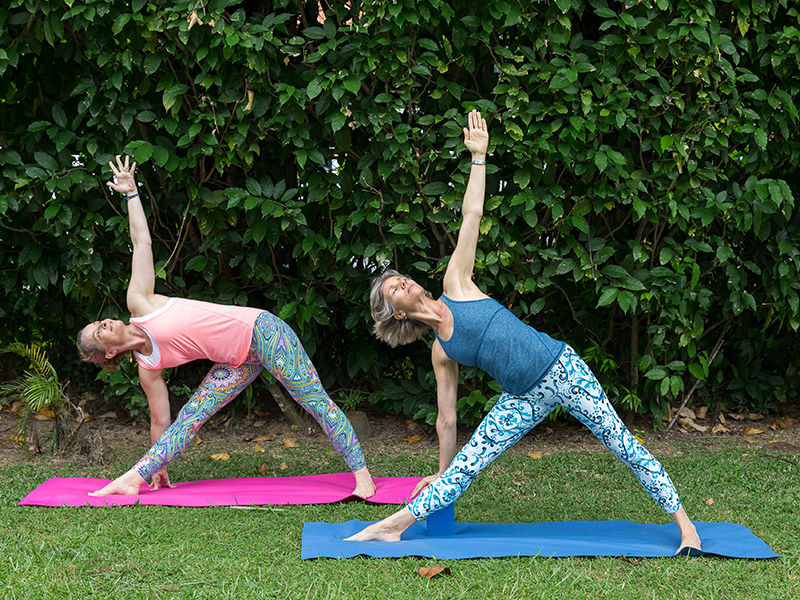
Keep breathing as you reach your right arm forward as far as you can. Then bring your right hand down to a block or to the floor, and stretch your left arm to the sky. Push your right fingertips into the block or floor, and extend up and out from your left fingers. Put your head back and expand into five big, deep and full breaths. Come up and repeat with the left side.
“As you turn and rotate your torso, your spine gets a beautiful extension and it opens the throat and chest as you do so; if you don’t get this open feeling then make sure you use a block!” says Sarah P.
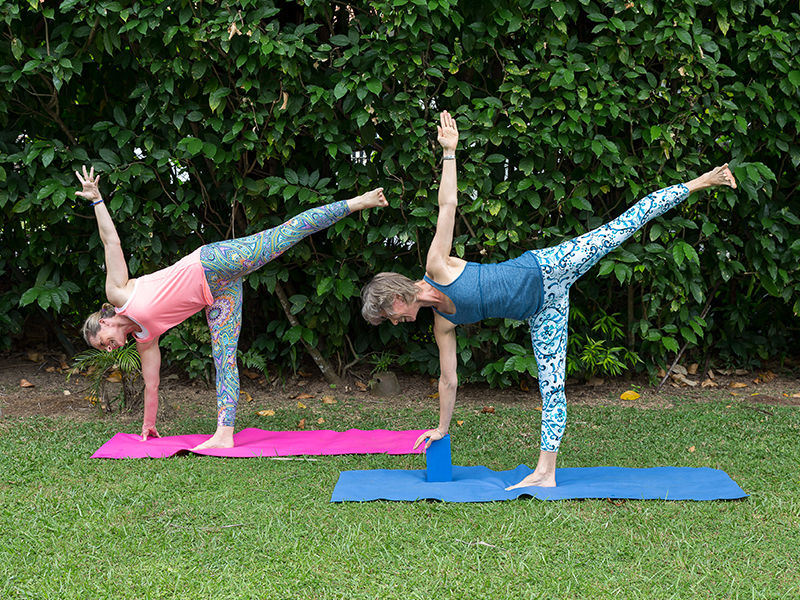
Ardha Chandrasana (Half Moon Pose)
A natural progression from Trikonasana, Ardha Chandrasana has all the same benefits and more, say our yogis. Plus, the balance required helps boost circulation, and deepens all of the stretches created by Trikonasana. The pose demands and, in turn, fosters, focus, poise and precision.
Step #1
After getting into a right-sided Trikonasana, bring your left hand to rest on your waist. Inhale, bend your right knee a little, and slide your left foot about six to 12 inches closer to your right foot. Start to shift your weight into your right foot (press down through the inner edge to prevent wobbles; hold a block in your right hand if you’d like), and reach your right hand (or block) forward so that it’s in front of your right foot.
Step #2
Press your right hand and right heel firmly into the floor, and straighten your right leg, simultaneously lifting your left leg parallel to the floor. Tip: Don’t lock your right knee, and keep your right foot’s toes and kneecap facing in the direction of your head.
Step #3
Stack your top hip directly over your bottom hip, and open your torso to the left. Then extend your left arm, pointing your fingertips directly toward the sky. Put your head back and enjoy five super-deep breaths. Then, repeat all steps on the other side.
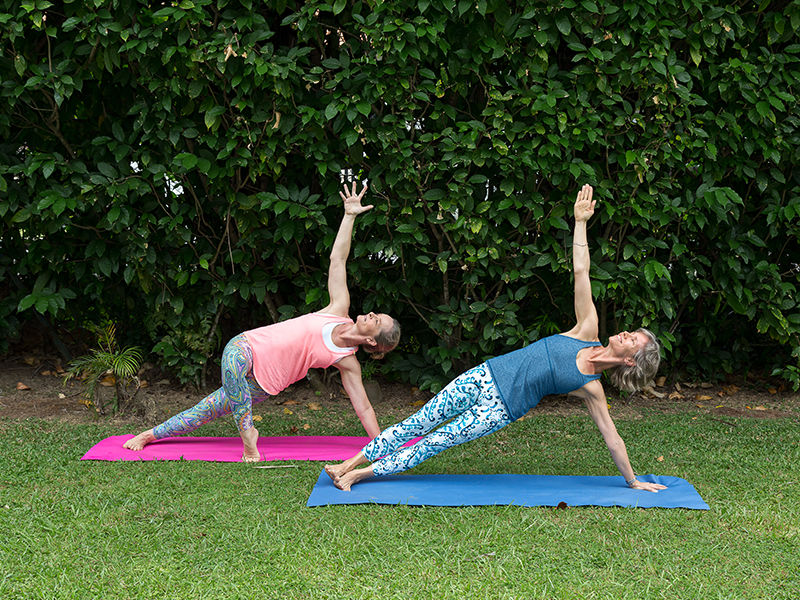
Vasisthasana (Side Plank)
Having worked your legs and spine, Vasisthasana targets the core, legs and entire body and strengthens wrists, forearms and shoulders. As it requires balance and breath control, it helps improve focus and concentration.
Step #1
Get into plank pose (top of a push-up), hands directly below your shoulders, and feet slightly apart.
Tip: Use a mirror or ask a friend to check your plank is straight – no sagging hips or lifted booty!
Step #2
Step your feet together and press your weight down through your right hand and forearm. Then, roll your body to the right, balancing on the outer edge of your right foot. Stack your left foot on top of your right foot and keep your legs straight. If this is too difficult, step your left foot forward as a prop (as shown by Sarah P, pictured left).
Step #3
Extend your left arm to the sky, expanding your fingers. Meanwhile, feel your leg muscles flex and tone, while drawing in your core and looping your shoulders away from your ears.
Step #4
Breathe – start with two breaths and build up to 10. Then repeat everything on the other side.
Sarah Powell Yoga 9457 1096 | sarahpowellyoga.com
Sarah B Yoga 8163 0106 | sarahbyoga.net
Photography: Ken Tan
This article first appeared in the February 2017 edition of Expat Living. You can purchase a copy or subscribe so you never miss an issue!
Like this? Read more at our Health and Fitness section.